Module 1, Chapter 4, Stitch Magic, Task 2, Zig Zag and Beyond.
Design 6b running stitch
Design 6b zig zag stitch
Design 6 running stitch
Design 6 zig zag stitch
Design 7 running stitch
Design 7 Zig zag stitchDesign 7b running stitch
Design 7b zig zag stitch
The samples that worked well are the stronger designs that have much thicker lines eg 7 and 7b.
The fine zig zag stitch required on 6 and 6b are virtually the same as the running stitch.
For this reason and because the lines are so much deeper and bolder I prefer the latter 2 designs.
Sample Page 2
I thoroughly enjoyed playing around with the zag zag stitch and finding out what could be done with my machine. The possibilities are endless! I like the "rushes" design and the strong "cross" design in the centre using the stitch width knob whilst sewing to alter the stitch and create this graphic image.
I do not think the top "boxes" design worked I was trying to combine different stitch sizes but created a weak finish. I could have sewn over and around with larger stitching on reflection.
Sample Page 3
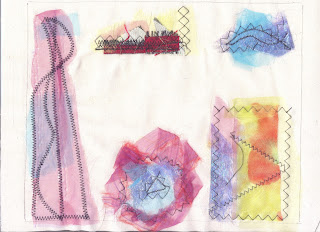
Started building up layers of fabric and over stitching in zag zag. My favorite mounted designs are the strong lines using a large zig zag stitch on the tall layered pink and blue chiffon. Love the flowing lines over the delicate material. Good contrast.
Also, I think the middle top design was striking I used scraps of raw silk that was fraying along with pieces of organza and stitched over in various sized of zig zag - pleased with the feel of it.
The rest have some parts I like but I think I could have made them better by changing the colour of the thread perhaps to a more subtle tone particularly on the yellow / orange bottom right design.
The blues of the fish shape top right is quite effective. Not keen on the round "rosette" type design - just hasnt worked, not structured enough for me and looks unfinished but not sure how I would have improved that.
Sample Page 4
This is where I started using the buttonhole stitch - originally all sewn on scrap lengths of black felt and then cut and mounted onto the orange felt background. I wanted a 3d effect and like the fact that not everything is attached! Its a strong graphic image and when I was doing it I loved it but now I prefer the more subtle colours and fabrics in the last sample page.
Sample Page 5, "lace" and "ruffle"
Began by sewing pieces of lace onto strips of fabric varying the colours from light to dark - there is cord sewn under the blue and purple / white lace, I was trying to "ruffle" but realised my zig zag stitch was not wide enough. I did get it right eventually as you can see in the purple and pink satin. I used a multi coloured thread throughout to add to the interest. As a sample page I was pleased and can see it will be useful in the future.
Sample Page 6 "Lady in pastels"
Using my own hand dyed satin fabric (from a previous local machine embroidery course) I began by ruffling the pastel bottom layer of her dress, leaving the cords in, at this stage there was no intention to create an "image" as such I was just playing around. The form developed though as I went and then I began to have a vision of a lady in a lovely summer satin dress. I love the finished piece and really like to finish a task on a good one. I have used varying satin stitch and colours in the background using the ideas from the previous sample page 2.
This is an additional attachment, it shows my attempt at lettuce leaf edging using a dark maroon pair of tights, with a white bobbin and a yellow top thread on a very tight zig zag stitch also the gathering using elastic on the pink stretch jersey material.


No comments:
Post a Comment